6.26.2016

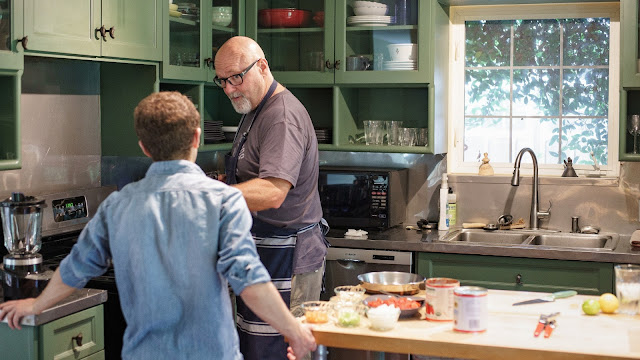
Taking a break from the camera excitement to focus on making food. My favorite chef made a house call.

Ben gets a lesson from Emmett Fox. How to make three different sauces for pasta.

My son, Ben, has been off at college for the last two years living in the dorms. In the Fall he'll get to move into an on campus apartment with three of his friends. He's thinking he'd like to try his hand at making his own meals instead of depending entirely (--- safety net implied) on the fare at the dining hall. He can cook basic stuff and he worked in the dining hall in his freshman year but our friend, Emmett Fox, thought it would be good for the boy to learn a repertoire of good, solid dishes. 

Emmett (who is the head chef and co-owner of two of Austin's favorite fine dining establishments: Asti Trattoria and Cantine Italian Cafe and Bar) made a plan to come over to our house today and give Ben a lesson in making pasta and sauces. Emmett sent me over a shopping list several days ago and then, yesterday, he sent a "prep list" over to Ben. While Emmett and I hit swim practice at the Rollingwood Pool this morning, and coffee afterwards with our swim buddies, Ben was dicing pancetta, sectioning tomatoes, slicing garlic, grating Parmesan cheese, dicing celery and carrots and onions. 

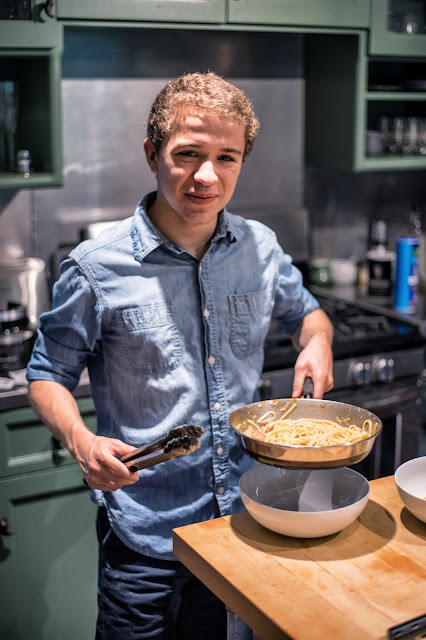
Emmett patiently showed Ben how to make three different sauces (carbonara, Amatriciana, and Neapolitano). Emmett also guided Ben in making the sauces by himself. I hung out in the kitchen with a Sony A7ii and a 50mm lens and just snapped away at the process. 

After the first volley, the Neapolitano, came out and was beautifully plated, Ben, Belinda, Emmett and I sat down and savored it, along with fresh Italian bread accompanied with olive oil from the Saratoga Olive Oil Company. They ship. 

With the Amatriciana simmering on a back burner, Ben and Emmett made a classic carbonara with pancetta, fresh eggs, black pepper, oil and parmesan cheese. They served it up in big, white pasta bowls and if there is any left over in the fridge I have first dibs. 

At the end of the (very happy) meal Emmett presented Ben with a very professional looking apron. 

It was great of Emmett to share his time and expertise (and great taste) with Ben. In fact, Ben has been going to Emmett's restaurants since he was four years old. He's a long time Austin regular at Asti and his early experiences with great food at Asti constantly influence his adventures with food. Emmett was feeding him escargot, cocoa sorbetto and bread sticks before Ben could read.

If you are in Austin and you want good food I highly recommend you try both of his restaurants. I've even produced videos for both of them. Here and Here. 

It was a great way for my family to spend the middle of our Saturday. More like this....


6.25.2016

Thursday is museum day around here. Makes for a nice break from "who has the best cameras?"


Thursday was interesting. I was recovering from post-project depression. It's that malaise that strikes one when a challenging and fun project is over, delivered and billed, and there is a lull in the work because you left some time blocked out, just in case...

I filled my time in the morning (after mandatory swim practice) by throwing stuff out. The excess included old cameras (a Leica 3c that's been absolutely brutalized and an Alpa 10D that's had the skin scraped off and lacks a coherently working shutter. Lots of weird adapters for stuff I haven't owned in over a decade, many batteries to cameras long since traded away, old, dedicated flashes and lots of rubber bands. After a morning of equipment purging I grabbed a Trek 7000 bicycle off the back porch and donated it to Austin Yellow Bike. Having at least paid lip service to the battle against "the desire for physical manifestations" I chilled out and headed to our favorite Austin museum, the Blanton. 

There are two great, new shows on the first floor. The first is a work by Xu Bing, called, "Book from the Sky." A Chinese artist has spent much time hand carving blocks of characters (over 4,000 in all) that are used for printing his "book." You can read the Blanton Museum's explanation here. But I was captivated by the intricate detail on the blocks he carved.


Next door to "Book From the Sky" was an exhibit called, "Goya: Mad Reason" and it was amazing in a whole other way. Over 150 paintings and prints by Francisco de Goya, considered by many to be the first modern artist.  After looking at the Goya show for nearly two hours I headed to the galleries upstairs to see some of my old favorites. But I had to confront a sad change. The Battle Collection of Sculptures is now gone. They have rotated the Greek and Roman sculptures out in order to make room for new shows of paintings. I guess you won't be seeing the same Greek busts every time I test out a new lens or camera in the future. Ah well, life and art move on....

Just below is the start of the installation in the old sculpture room....


I spent my afternoon in the museum with what has quickly become my favorite, "go everywhere" play and shoot camera; the Sony A7ii with the 50mm f1.7 mounted on it. Such a nice blend of size, Herculean capability and dense, physical integrity. I love it. It's my "ultimate" hobbyist camera --- (my lawyers asked me to add the following): "ultimate" ...for the moment. Subject to change or modification at any time. The expressed enjoyment of the camera named above is not a binding agreement or legal or moral obligation to use that camera ad infinitum or exclusively. All superlative reviewing comments are solely the provenance of the writer who may or may not be influenced by hysteria, insanity or artistic and non-linear modalities of thought. Further, this should not be interpreted as an encouragement, enticement or sales pitch aimed at motivating any person or their chattel, living or surviving in some stasis, to also buy or otherwise obtain and use said aforementioned camera. The existence of this blog post does not imply or promise that your meager skills can or will be improved by acquiring and using said camera.  No bailment is being constructed or offered. If you are inclined to use the (non) word, "meh" in any discussion of the camera, or its use in connection with this missive, you should consider punishing yourself by eating too many jalapeƱos at one sitting, far, far from a functioning water closet. 

The camera seems like a perfect blend of resolution, color reproduction and handling; especially when paired to smaller, single focal length lenses. 


I admire the small images and the large matts. Definitely a move in the right direction..

There is no sense in going to a museum if you already know what you like and believe what you know. But for the rest of us the experience of experiencing something new and different is a real experience. 


6.24.2016

I read that some "professionals" are considering replacing their 35mm style cameras with the new Hasselblad X1D. I almost spit out my coffee because I was laughing so hard...

Photograph from "James and the Giant Peach", a Zach Theatre production.

People say zany and inane stuff all the time. And, in the field of photography, they love to conjecture about what "professionals" might buy or want. But usually the commentators do so in flights of fancy and with few facts or evidence...

A case in point is the suggestion, made in many corners of the internet, that Sony, Nikon and Canon better beware!!! A new cowboy is riding into town and he's packing ---- medium format!!! And, since it is only almost three times the price of the best, current pro 35mm style camera on the market (the Sony A7R2; according to DXO) there is the idea that hordes of amazingly wealthy, working camera professionals (because, you know, it's a lucrative career path) might just weigh up the apples and oranges and go for the power, glory and obvious superiority of the medium format choice.  Not so much in pursuit of better photos but to differentiate themselves from all the other well heeled, working photographers out there. You know, to differentiate them--- in the eyes of their clients...

The assumption is that they'll dump the Nikon D810s and the Sony A7R2s (and whatever Canons) and embrace the mirrorless, contrast detect-only AF, snail pace frame per second Hasselblad X1D --- and its two amazingly flexible lenses, in order to make their businesses rock and roll. Even as I read the first volley in this line of reasoning I was busy trying to keep from spitting out a mouthful of coffee because I was laughing so hard. 

While there are professionals working in a lot of different marketing segments most of them have a large intersection on the Venn diagram of needs when it comes to cameras. One of my main concerns is that I always have an identical (or close to it) back up camera. If a camera breaks and needs to go back to the tender mercies of the camera company's repair department, or gets stolen, I need to have a second body so I can finish the job, get up tomorrow morning and go out to shoot again. In all the pro systems based on the 35mm size sensors you can get a similar body at a lower price point to play the role of "safety net" for you usual shooting camera.  For me the Sony A7r2's first line of back up is the A7ii. But I can follow that up with an a6300 and then the a6000. All the cameras can use the same lenses, have the same basic menus, deliver the same color family characteristics and, miraculously, all use the same batteries.

If I ante up for a round-the-world-shooting-extravaganza I can do so with a back-up body from Sony and still spend less than $5000 for camera bodies. Really good camera bodies. Nikon and Canon users can do the same thing. If you put together a second body for the new X1D and you've spent $18,000 before you've even sprung for lens #1.

But speaking of lenses, it seems that the world of photography on the web has done a 180. Now lens choice is not an issue. When Sony was kicking everyone else's butt, last year and this year, all I ever read on the review sites was....  "Well, the sensors and the camera are incredible but....there are only 14 or 15 Sony lenses and maybe 25 to 30 third party lenses to use with the system--- how sad and tragic for the pros..."  But, of course, Sony photographers can cherry pick from all the major lens lines with help of inexpensive adapters. Heck, I can even use my 1970's era Hasselblad 150mm Sonnar on the A7R2. They opened up the  mount. It's an open system.

But don't try mounting that V lens for your old Hasselblad on the X1D body because: a. It won't fit. b. It won't actuate. You might be able to physically mount it, when and if someone comes out with an adapter, but without an electronic link to the lens shutter the only two things you might be able to do with the package is to look through the finder and maybe shoot some video. Some 1080p video at 30fps. You know, like video from four years ago....

So, if only a handful of very, very expensive lenses will work on this new model how much business can we do with the two current lenses? Not much. The longer lens is too short and the shorter lens is too long. A lot of us make a living shooting portraits and we need something between 110mm and 140mm to get a decent head and shoulders portrait without the dreaded foreshortening effect. But that's not even in the cards for the next lens in the X1D pipeline. That would be a 24mm equivalent which leads me to believe that the camera system might be aimed at the highly affluent part of the market that shoots real estate interiors for realtors and brokers. Which might make sense give that the camera uses CD-AF and who knows what the follow focus or fast lock on capabilities of the camera really are... But let it lock onto the details of a high rise condo kitchen and then --- stand back!

Of one thing I am fairly certain; it will be win a gold award from Digital Photography Review. Why? Simple! It has everything that every working professional truly needs to make great images in the fast breaking imaging world of today. It has wi-fi AND a touch screen. And everyone knows that Barney and Company prize those two attributes to a much greater degree than the boring stuff like: great color, high sharpness, beautiful tonality, etc. Just as long as we can stroke the rear screen and get a reaction from the camera we'll have their whole-hearted buy-in.

I have no doubt that the camera is as beautifully designed and finished as the dashboard of an Aston Martin Lagonda and it will have much appeal to hipsters of a certain coupon clipping class. But every pro worth their salt would trade all of that for: Accurate and quick focus. The lenses they need in order to get the jobs done while honoring their unique vision. The ability to have back-up gear. The ability to use a wide range of lenses readily available in the market. Etc.

On a more positive note: I read that the battery is big and powerful. And I like the choice of the mini-HDMI port instead of a micro-HDMI connection. Oh, and the engraving that will tell every pro, every time he or she uses the camera, that it was handmade in Sweden. Got it. Hermes scarf anyone?


6.23.2016

A few thoughts on the new Hasselblad medium format camera. Just a few...


I think it's interesting to see all the old players in the camera market scramble to try and divine just what the modern consumer really wants, and where the profitable niches still exist for their brands. Hasselblad has been floundering since the dawn of digital and there are probably more reasons than most of us know for their perilous situation. 

I have been a Hasselblad user for a long time. Well over twenty two years. I've watched them (with sympathy) go from being the prestige camera maker, favored by the top working professionals in photography, to a company trying to re-brand decent cameras from Sony and then price them as though the addition of the H-Blad nameplate was a tremendous value-add. 

I think it's important to understand what initially made the Hasselblad product so sought after; pre-digital. I think the single most defining feature of the V series cameras had to be the square aspect ratio. This allowed the camera to be used in exactly the same way whether shooting with a vertical or horizontal intention. This meant that the camera never had to be turned sideways. While it was a very convenient way to shoot it also made it incredibly easy to shoot images square for final use. Legions of portrait photographers and artists of all types came to find the balance and integrity of the square to be very valuable. Seductive, almost.  In truth, I had no real loyalty to the Hasselblad brand but I have been (as a medium format practitioner) very loyal to creating in the square. In addition to the Hasselblads I have owned, I have also owned, and been very happy with, the Mamiya 6 cameras (square, 6x6) the Rolleiflex 6000 series cameras (square, 6x6), the Rollei twin lens reflex cameras (square, 6x6) and even the occasional Yashicamat 124G or the Mamiya C220. 

The common denominator across all these cameras was the wonderful and glorious square. 

Now, I have a bit of background in semiconductor technology and I understand very well that making larger sensors with a high yield is a very, very expensive proposition. In the early days of making medium format sensors the aspect ratio of the chip dies was a direct result of the need to maximize the use of wafer space and that meant using a rectangle. Making a large, square sensor for what was perceived as a very limited market was just illogical. In fact, I'm willing to bet that Dalsa and Kodak didn't get around to offering one to the rarified MF market until much further into the evolution of medium format cameras. But, in point of fact, by denying previous customers of one major attraction to their products, Hasselblad was already falling down. 

Continuing along the evolution of the digital products, the other major attraction of the square, film Hasselblads was the sheer surface area of the film. Having a 6 by 6 cm canvas to create with meant that lenses with longer focal lengths were required to get the same angles of view as smaller formats.  This meant that the optical signature of the system was much different. At any angle of view the fall off between areas of sharp focus and out of focus was much quicker and much more pronounced. I call it focus ramp but other people (wrongly) refer to the effect as bokeh. Some of the allure of all the film medium format cameras was the way the longer lenses elegantly separated the in focus subject with an out of focus background. With the need to engineer and design around much smaller (geometry) sensors, early on, (and still, today) the visual results of today's MF systems offer a compromise; the focus falls off more quickly than does that of a 35mm equivalent but much less quickly than it's run-of-the-mill ancestors. 

So we don't get the square and we don't get the full effect of the focus ramp I've described but what we did get was a frightfully expensive series of cameras that required a whole new series of lenses and provided (as a minor justification to the absurd cost of said lenses) us with autofocusing, which most of the intended consumers for the product neither needed nor wanted. Gosh, this just sounds worse and worse as I write all down....

In the film days one could pick up a decent and highly functional, used, square body for about $800 and a nice 150mm portrait lens, complete with T-star coatings, for about $1200. You could put down your $2K and start shooting fashion, portraits, editorial stuff. No problem. But in the mid-era of Hasselblad's engagement with digital we were looking at bodies in the $30,000 range and the need to buy a totally new collection of much pricier lenses. It was almost as if the company (already a lux maker) had used the move to digital as an excuse to make insane price increases.  And all for cameras with small, 645 aspect ratio sensors, and a handful of pricey lenses made under license by Fuji. 

The market voted with their feet, and out of necessity all the but most well heeled professionals opted to figure out how to make cameras from Canon and Nikon work well enough to serve their markets. The cost of entry into Hasselblad's version of the future was just too much to bear for the vast majority of photographers who had loyally used their products for decades. 

So, now they've hit the wall and they are looking for a brand new camera (with a brand new set of lenses) to save their bacon. Maybe the X1D will be the camera that will save the company from oblivion. But I don't think so. It looks cute. It's small and seemed nicely designed (thank you, ex-Volvo designer....) but it just seems so much like what Bronica did as a last gasp to hold onto their film customers. They came out with a 645 rangefinder body, along with a small line of slower and less expensive lenses and it was a marketing failure. 

While I'll admit that not everyone shares my love for the square I think that Hasselblad dropped the ball on a good opportunity to differentiate this camera--- and by extension, their brand --- by not having the camera use a square format sensor. But the major failing is their inability to read the current market. One of the reasons Sony has seen significant growth in their A7xx series sales is the fact that by going digital and reducing the space between the lens mount and the sensor, they created, essentially, an open architecture that allows users to try just about any interchangeable lens on the market. Why does this work? Because there is a shutter in the A7xx body. The new Hasselblad system, based around the X1D, is designed with shutters in each lens and not in the actual body. You might be able to source an adapter sometime in the near future but if you put lenses on from other systems there is no shutter with which to actually take a photograph!!!!!

For around $14,000 you get a system that locks you into using either the large and expensive H series lenses or the two new (slow)  X1D lenses that were announced with the camera. The sensor in the camera may have twice the surface area as the familiar 35mm camera sensors but in terms of linear differences it amounts to barely more than a single digit percentage increase. In comparing the sensors in the Sony A7R2 and the X1D it's just a difference of approximately 7900 pixels (Sony) versus 8200 pixels (H-Blad). It's certainly not enough to make any difference at all in normal print sizes. And there's no matching portrait lens to boot.

Continuing with the comparisons the Sony and the H-Blad have the same EVF resolution numbers and while the H-Blad specs show a hopeful 14 stops of DR the Sony is already in that ballpark, according to DXO. I wouldn't be surprised to find out that Sony makes the sensor (and maybe even the engine under the skin...). The appeal is limited by Hasselblad's limited vision of what consumers really, really want and what professionals really, really need. 

It's a cute little system that's out of the budgets of most amateurs while being too limited (lens selection) to suit most professionals. And, from my personal perspective, $14,000 in 2016 should buy you 4K video performance. The camera is limited there too. Ah well, it was never aimed at me...It's not square enough.


A few days ago I wrote a post about lighting on location with LEDs. Here's how the final image looks.

Portrait Subject. 

Several days ago I wrote a post that showed how I was using LED lights to illuminate portrait subjects at a law firm here in Austin. I wanted to follow up that description of the technical stuff by showing what the final result looks like so you can better understand what I was trying to accomplish at the shoot. The image above may not be the one finally selected by the client for inclusion in their website but it is a good example of what we were going for. No major retouching has been done.

To refresh, the taking camera was a Sony A7R2, using a Rokinon 85mm t1.5 cine lens set at f2.8. My goal in lighting is to first make the subject look great while matching to a consistent look for all the thirty+ images I've made for the same company over the last few months. My lighting goal is to control the color and quality of the light on the subject while effectively blending the existing light from three different, continuous sources (exterior through the windows (blue/cyan), mixed spectrum florescent, and more yellow spectrum from compact fluorescents in ceiling cans). The effectiveness of precisely targeted, custom white balancing can not be underestimated.

That's it. 

(Sorry for the delay between the first blog and the example photo. I wanted to receive permission to use my client's portrait before posting it here. Not necessarily required but very appropriate....).


6.22.2016

The cheap Zeiss Y/C lens works. I'll keep it.

Belinda was making fresh corn soup on Monday. Here are the primary ingredients. 

I'm pretty happy with the Zeiss 50mm f1.7 for Contax. I bought the lens and an adapter last week and got the duo on Monday. The lens is relatively old but in great shape. I'm guessing it was the current cheap 50 for the Contax RTS system in  the late 1980's and early 1990's, and then fell away when the Contax N system came out as the last iteration of the Yashica/Contax cameras before being swept away by the digital revolution. 

I finished up my "must do" work and took some time out to do a brisk walk through central Austin with the 50mm f1.7 cobbled on to the front of the A7ii. I did one thing differently today; I put a .9 ND filter on the lens so I could easily shoot at the optimum apertures instead of being pushed into the range where there's practically no difference between cheap or dear lenses, in terms of performance. I tried to shoot mostly at f2.8-f4.0 today, along with keeping my ISO at 100. That's why the left and right sides of the fence shot (below) go out of focus. It's not a fault of the lens, it's the limited depth of field available. Where the lens is in focus is pretty darn sharp. 

From time to time I took the ND off the lens so I could make sure I wasn't killing the overall performance of the lens by inserting two more air/glass interfaces into the basic lens structure...

Shooting with this lens on the Sony A7ii was a blast for me because it took me right back to the feel of my first cameras. I'm from the generation that started with manual focus lenses and I'm always most comfortable (if the finder works well enough) when I turn off the automation and just use my fingers and my eyes to get stuff focused. Once you are focused you can take your fingers off the ring and shoot to your heart's delight, right up until you change the camera-to-subject distance. Nice for faster shooting.

I didn't notice any faults in particular with the lens, and the package of lens/camera/adapter is still small and has a low impact on the user when carrying the collection around. We are now officially on the search for more wonderful and elusive Zeiss glass from this particular system. I hear they made three different 100mm models. Sounds like something I might need....

On another note: I am doing an interesting self-experiment. I have not touched the novel (The Lisbon Portfolio) since I launched it on Amazon back in the Summer of 2014. I picked it up last weekend and decided to re-read it after a two year passage of time. Would I still like it? Did it hold up? Were the editing oversights as egregious as everyone says? 

What I found is that I thoroughly enjoyed reading it and, after the scene with the gun fight in the bathroom, I could not put it down until I finished it. So, I will toss this out again.... If you know J.J. Abrams (the director of the latest Star Wars movie, etc.) please toss a copy of the book to him and implore him to read it. I'll be happy to option the movie rights to him. But, if he doesn't get on the stick it may be too late. I may have to send a copy to Sam Mendes (latest Bond movie, Spectre) and see how interested he might be......

If you have not read the book you probably should. It's entertaining and all about photography----kinda. Give it a try. The Kindle version is super cheap on Amazon and the Kindle app is free for many, many devices.... Really, get a copy...


Get the technical stuff right and you'll find your camera (whatever it is) might be better than you ever thought possible.


From "James and the Giant Peach." A Zach Theatre Production.

I guess it's not hard to imagine that a lot of my close friends are photographers and filmmakers. In some of our down time between projects we have a tendency to meet at the local coffee shop and discuss a wide range of topics related to our work. It's nice because it provides and information feedback loop that helps keep us current. Everyone seems to have their own point of view and their own assessment of the value, and the balance of, technical and artistic considerations.

One of the discussions that came up this week concerned video cameras but is cogent to all cameras. My friend had shot some video with his Sony A7Sii camera (a really good DSLR for shooting video) and was observing that the 8 bit files from that camera were more "fragile" than the 10 bit files from his other video camera, a Sony FS7. I asked him to explain and he told me that he is able to color correct much more aggressively with the bigger files and that smaller changes to the 8 bit file cause those files to quickly "break" and lose image quality. He said that the same was true when it came to correcting exposure or lifting shadow and recovering highlights. Much more latitude for correction in the bigger camera.

As I struggled to understand why one camera could be so much better than the other I asked a few questions about his shooting habits. It turns out that he is not as concerned about getting a good white balance prior to shooting because he feels that he can correct a great deal in post processing. He does not use a light meter and has similar beliefs about exposure correction in post processing. That's fair; everyone works in a different way. But my point of view is different.

Rather than depending on the latitude and flexibility of the final files from a still or video camera I tend to take the approach that most cameras can give very convincing results if you are able to fine tune your shooting parameters to optimize your files at the time of shooting.

Whether your camera shoots in 8 bits or 10 bits as long as the files are not raw a certain amount of color shifting is permanently part of your files if you are not making custom white balances. I'll admit that I was more reticent to take the time to custom white balance with my Nikon cameras because the procedure was complex and I would sometimes forget the process without my cheat sheet. But, if you shoot a Jpeg file and the file is too blue that means some of the yellow color information has already been thrown away and the best you can hope for in post processing is an interpolated and non-linear, subjective reconstruction of the file color. You are basically trying to boost the yellow channel and replace the lost yellow; working from memory. The information is already lost. And the loss of information in one channel overloads the color balances in the remaining channels.

Remember too that color balance also effects exposure! At some point, if too much color from one channel is discarded it is impossible to get back to a neutral balance which would have been the starting point in post processing, if a custom white balance had been done.

In my workflow at shoots the color balance precedes every other step. I always custom white balance before I set exposures.

But even in the custom white balance process there is ample room for error. While a so-so custom white balance beats auto white balance in many situations the truth is that most people are sloppy with their technique here too. The problem is that people see all white as "white." They aim their cameras at typing paper, seamless backdrop paper, a white cotton shirt, white paint, white boards and tons of other "whites" which have UV brighteners, which fluoresce, which have various color casts, etc. The use of UV brighteners makes paper look brighter and more highly reflective but it also causes magenta and purple color casting. Some papers are warm and some are cold in color. White boards have a lot of blue included in their spectrum which makes them look "cleaner" to the human eye.

The solution is to use known targets for WB that are designed with neutral white in mind. The use of the same target for every situation gets you a giant step closer to consistency and color matching between shots and between takes. Whether you use an Expo disk (lens mounted white target diffuser) or a Lastolite pop-up target or a Macbeth card, or some other known target engineered for neutral response your use of a consistent target will eventually give you greater and greater confidence in getting good white balance and will make your time correcting color in post much more enjoyable.

Buy a good white target and your camera becomes more color accurate than a more expensive camera that is poorly white balanced. Neutral is nice. It's one way of being happier with the camera you already have in your hands.

The same thing is true about exposure. The closer you get to optimum exposure the better looking your final files will be and the less work it will take to get them all to both match and show good detail in highlights and shadows. A camera with a limited dynamic range is scrupulously set to a correct, metered exposure will have more overall latitude than a more expensive camera that is set up to over expose or under expose. And even if you can "lift" the shadows with that miraculous Sony sensor you are losing detail and potentially introducing shadows banding whenever you make the lift.

I tend to use a meter because I trust an incident meter more in tricky lighting than the histograms in most cameras. And I trust the histograms in most cameras much more than I do the LCD review images. But my latest technique for good exposure setting comes from having worked a lot in video lately with cameras that have zebra stripes. I set the cameras I use to have the zebras indicate when a highlight is at 100% or higher. I aim the camera at the white balance target placed in the plane where I'll have my subject. Then I shift exposure settings until I see zebras. Then I bring down the exposure until the zebras on the white balance target just disappear. At that point I know that my whites won't burn out and that I've exposed as brightly as I can without the danger of overexposing my main subject.

A perfectly white balanced camera, set to the optimum exposure will yield the widest range of tones and the best image quality, regardless. If you have a better camera then the same holds true. The tighter your command of technique the better than camera becomes.

Once the essential camera parameters are set you are then welcome to knock yourself out and be the beret wearing, espresso sipping, monocle adorned artist you always knew you were....

Next up I guess we should look at working in a location with mixed color light sources. We've got a plan for working with that as well.

6.21.2016

The search for my ultimate 50mm lens to use on the Sony A7ii is on temporary hold as I try out an interesting lens. It's on probation.


I've been prowling through the commercial-o-sphere looking at 50mm lens options for the clever mirrorless cameras that Sony keeps dangling in front of me. I like 50's. I like them a lot. But there is something strange and off putting about spending $900 or $1200 to get a decent normal lens when the world is filled with magnificent 50mm models from days gone by. And mostly they are available for much more reasonable prices. The only additional price of admission is an inexpensive adapter...

Back in the early 1990's I had a brief flirtation with the line of cameras built by Yashica and sold under the Contax brand. They had a licensing agreement with Zeiss and under that agreement they created and marketed a line of lenses that were really quite good. I had two different 50's from them; the f1.4 and the f1.7 and both were very good lenses for me. I have to confess that while I know I was supposed to like the faster and more expensive lens better I always favored the images coming from the f1.7 version. The benefit of that littler Zeiss lens is that it's small, light and sharp. Even with an adapter along for the ride it is not burdensome on the A7ii and, in fact, is the perfect fit where I am concerned.

I ordered the lens and the adapter from a merchant on Amazon. I was fine with the stated delivery time which would place the duo here between the 23rd and the 27th of the month. Imagine my delight when I came home yesterday and the box from Amazon was hanging out of my mailbox. Three days early! Nice surprise.

Over the weekend I had a chance to play with the Rokinon 50mm 1.4 and, while I am sure it's a good performer, the new, little Zeiss package is much more ergonomic. My total cost for the lens and a C/Y to Nex adapter was less than $150. I've shot a few images but certainly not enough to say anything definitive about it. Yet. My cursory observations include: Wow! No vignetting. None. And, wow, the finder image is bright and contrasty. I've got the lens with me today and it's following me on my rounds. I'll shoot with it as much as I can. Then we'll see if inexpensive, Zeiss branded stuff from the 1990's can hold a candle to modern, un-adapted glass.


The lens is small and the adapter is simple.


6.20.2016

I went to work today and made some portraits. I was copying myself and what I did for the same client a few months ago.

In the fourth quarter of last year I photographed a number of attorneys for a large law firm in one of the glorious new high rise buildings in downtown Austin. It was a fun shoot. The principals driving the photo shoot has seen a style I'd been shooting for several tech firms and liked it. They wanted a variation for their new website and so I found myself walking around the floor they inhabit, high above the street life, looking for cool backgrounds. We wanted to make a variation of environmental portraits where the background goes wildly out of focus and becomes a wash of colors and shapes.  If you are going to do this style you need some backgrounds that you can get far enough away from to drop off the focusing in a convincing way and those backgrounds should have some colors that work with portraits.

I found five or six different locations around the offices but the one I liked best was the above angle from the lobby looking down a short hall, with small conference rooms on either side.

Once the camera is set up and a subject in place this is what I want the background to do (see just below). 
I've intentionally silhouetted the person in the photo because it's an actual client portrait and I don't have permission yet to actually use her likeness in the blog. That's one of the restrictions of being a working photographer....

The windows to the left and behind the subject are interior windows of frosted glass that form the interior walls of the small conference rooms. So the (indirect) light from outside is coming through the outside window, filling the conference rooms and then illuminating the windows that the camera sees. The hall is more or less daylight balanced. Once you find a background you want then the next part of the process is figuring out the relationship of the subject to the background and the spatial relationship of the camera to the subject. Those relationships show me where I'll be standing and how I'll be lighting to get the look I want. 

The image just above shows my basic set-up today from behind the camera position. So let's break down why I have everything set up the way I do. I'll start with the chair. It's NOT for the subject to sit on. The chair will be directly in front of the subjects and they will be standing behind it using the chair back as a device to rest their arms on. Their forearms and hands are outside the crop but having a place to put one's hands goes a long way to helping people pose more comfortably. Having something to put your arms or hands on also "anchors" the subject into defined area which means less worry about focus accuracy and inadvertent changes in composition caused by our talent moving around. 

Bringing the chair in at the beginning also gives me a target zone for setting up my lighting and assorted modifiers. My next step is to set up my two 24x36 inch soft boxes. Each one has a CooLED 100 (these are the ones with the two by two inch square, SMD LED elements that effectively emulate the characteristics of a traditional bulb, as opposed to the less controlled panel LEDs we've used in the past. 

I use two soft boxes, butted right next to each other, to both soften the overall light and also generate enough light output to get me the shutter speed/f-stop/ISO combination that makes for the best image. I love lighting environmental locations with these continuous output lights because it gives me good control over the total lighting effect while helping to prevent blinking and flinching that the anticipation of flash generally causes (in people disposed to having a sensitivity to quick flashes). 

The next layer of stuff I add to the set up has to do with controlling the existing lighting that effects the area we'll be shooting in. My subject is actually standing in the lobby and nothing there is lit by natural light. Everything is illuminated by either long, fluorescent tubes or can lights in the ceiling. Since there are two different light sources, and both of them are not very well corrected. My job is to take that light off the subject altogether. I want to reduce or illuminate hard top light and the yellow/green spectrum the comes with it. 

That's where the circular, pop-up reflectors come in. One gets placed a foot or two directly above the standing subject. The role of this round, translucent diffuser is to knock down the top light by two stops and to also diffuse any light that insists on getting through. It's a vital tool, otherwise you'd need to radically increase the power of the two lights in the soft boxes to overpower the hard, top light coming from ceiling fixtures, and then you'd change the total character of the light in the room and make the whole scene look very artificial. 

The second reflector/diffuser is the one over by the wall on the right (looking from camera position). It's there to provide clean fill light in the form of bouncing the main light from the two soft boxes into the shadows on the opposite side of my subject. Having the while panel near the wall keeps the yellow cast from one of the ceiling cans from bouncing from the yellow wall paper of the wall back onto the subject. Kind of a critical addition if you want to keep your subject's face color neutral on both sides. 

The LED lights are pretty accurately 5600 K so why do the windows in the background look so blue. The frosted glass is neutral and translucent but think about it for a second... The light that's transluminating them is coming from essentially open shade and since it's not direct sunlight it's actually somewhere between 6500K and 7000K which makes it much bluer in appearance that the daylight balanced LEDs.  The room is warmer than the LEDs or the outside illumination but we are effectively controlling all the light striking our subject directly. 

The final step in the set up is to choose the right lens and then choose the right exposure/depth of field characteristics for your photographs. I was using a very fast 85mm lens on the front of a Sony A7R2. Using it at about f2.8 meant that we can reasonably tell that the background is an interior office space but without showing too much distracting details. The softness of the background goes a long way toward concentrating attention on the subject while the interplay of different color temperatures also helps to separate picture elements.

To try and do the shots with just a fast lens and no lights or modifiers would result in an image with weird shadows on the subject's face along with providing a tough time for anyone trying to deal with the ongoing cascade of colors and tones.